
4 Lighting Tips for Great Video
Occasionally, you may not have the luxury of hiring a professional production company to shoot your video for you. Maybe there's a last minute opportunity to interview a star customer and there isn't time to schedule a crew (though you should still give us a call to see), or maybe there's a syngeristic moment that presents itself at a trade show. Or maybe, you want to do something creative after work and shoot a web short.
Whatever it is, you'll want to make it look as good as possible.
So you should go out and buy a top-of-the-line video camera for these moments, right?
Wrong.
The key to great video is not the camera. It is the lighting.
What?
Yes. It's the lighting that can make or break a video.
Are you familiar with a guy named Stephen Spielberg?
Don't get us wrong; we aren't arguing that he shoots with cheap cameras.
He absolutely does not.
But his films' distinct looks have everything to do with a man named Janusz Kaminski. Kaminski is the Oscar-winning cinematographer who has been behind every Spielberg film since 1993. His lighting is world-renowned and emulated by the best in the business.

In fact, you know that incredible shot in True Grit - the shot that introduces Jeff Bridges's character for the first time in the court house, backlit and bathed in sunlight? Cinematographer Roger Deakins credits Kaminski's influence for that scene. (Read more about that here).
Now, we're not proposing that this blog post is a master class in lighting, but we do have 4 practical lighting tips that will help you shoot a great looking video. For our visual learners - check out our SlideShare below.
http://www.slideshare.net/MediaBoss/5-lighting-tips-you-shouldnt-shoot-without
No. 1: White Balance, Please.
Please white balance. Forgetting this simple step can ruin a video right out of the box. No kidding. Clients ask us to 'fix' their self-shot footage every once in a while and many times we are able to accommodate this request. But if they did not white balance before shooting, the process becomes tricky. And costly.
How to White Balance:
First, RTFM.
Then, keep a plain white card in your kit. If you forget your plain white card, see if you can grab a piece of blank printing paper somewhere.
Point your camera at the white card and then press your camera's white balance button you read about in the manual.
But, what if my camera doesn't have a white balance?
If you are using a single chip HD camera then you have no control of the white balance settings because it's on full-time auto. But don't fret. There are ways to make sure you are getting the best out of your camera. Just make sure you are dealing with only ONE type of light at a time.
Open the shades and turn off the flourescent lights and you will have the control you need. If you're shooting in a windowless office with Fluorescent lights, make sure you turn off any desk lamps. The desk lamps are most likely Incandescent lights and Fluorescents and Incandescents do not mix well.
No. 2: Use the Sun.
Because, sometimes the best things in life are free.
The first major source of light is also the best source of light. The sun has a full spectrum of light and it renders color well.
A Few Tips:
Position your subject one of two ways:
Film them with the light shining directly in their face (if they are comfortable and don't need to squint too much), or film them at an angle so that one side is hot and one side is not.
Try not to shoot at noon. The shadows come from above and are difficult to get rid of. Early morning and afternoon has softer light with a more golden tone and fills your subject better.
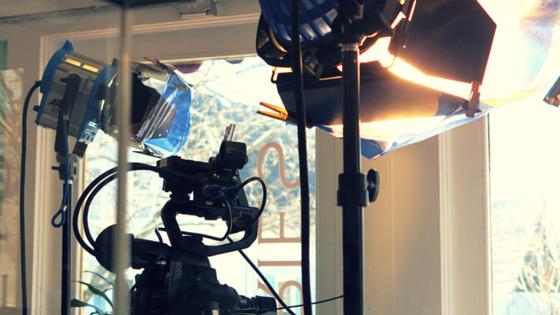
No. 3: Add an External Camera Light.
When the lighting comes from a source above, like a gym or an office or outdoors at midday, a camera light is excellent for filling in the annoying shadows that appear on your subject's face.
There are literally hundreds of different options. We like our LED light panels, but there are less expensive options. You can find perfectly adequate external lights for $30.
No. 4: Use a Light with a Stand
A light on a stand is an important upgrade to your production rig for a couple of reasons.
1. They give brighter light over a larger area
2. They allow you to move the camera angle without moving the lighting set up.
Bonus Tip:
Take care to isolate your light sources.
i.e. Close or open your shades, turn off office lights, etc.
And Remember:
When you mix light, your primary source needs to be the brightest!
We hope these tips help you out on your next production. If you think we missed something important, let us know in the comments!

Comments